Grow Like A Pro Guide
Cut Flower Starter Pack
Variety & Spacing Guide:
3 Lisianthus 6x6 ‘Arena Apricot’
2 Scabiosa 9×9 ‘Merlot Red’
3 Strawflower 9x9 ‘Bright Rose’
3 Cosmos 9x9 ‘Rubenza’ or ‘Fizzy White’
3 Celosia 9x9 ‘Cramer’s Lemon Lime’
3 Zinnia 9x9 ‘Aurora’ or ‘Queeny Lime with Blush’
3 Gomphrena 9x9 ‘Raspberry cream’
3 Marigold 12x12 ‘Coco Gold’
3 Thai Basil 9x9
1 Dahlia cuttings 12x12 as labeled
4 Heirloom Chrysanthemums 12x12 as labeled
Example of Intensive Spacing: planting in “windows”
x x x x x x x x x x x x x
x x x x x x x x x x x x x x x
x x x x x x x x x x x x x
Planting Instructions
Tools Needed:
Spade or Hori Hori knife
Water hose with spray nozzle
Rake (optional)
Materials Needed:
Raised Bed Method: Raised Bed and Organic potting soil
Organic balanced fertilizer (optional- not necessarily needed if applying fresh potting soil)
Mulch (optional) - grass clippings or leaf mulch is best, straw/hay works with heavy application
Choosing a Site:
FULL SUN : at least 6-8 hours of direct sun per day
If given the option, morning and midday sun is preferred over midday and afternoon, but either will work.
Well-draining soil! Be sure to avoid areas where water pools up, your plants may rot if water does not drain. Any containers must have drainage holes.
1. Prepare your garden space:
For this starter pack you will want around 16 square feet, which could be a 4 foot x 4 foot space, an 8 foot x 2 foot bed, or some other variation. It can be a raised bed, but certainly does not need to be. We have designed this garden bed to use intensive spacing (close spacing) but you are welcome to spread your flowers out as you like. If you decide to spread them out over a larger area, you may want to consider mulching with grass clippings or shredded leaves to suppress weeds.
If you choose to do a raised bed you will want to use an organic potting soil or compost at least on the top 4-6 inches. If planting directly into the ground you will want to till your soil to prepare it for planting. Raised beds generally have less weed pressure than planting in the ground. Alternatively, you can utilize “no till”methods by suppressing and killing off grass for a few weeks with a tarp then lay cardboard, spray it down with water, then apply 4-6 inches of compost on top. Be sure to mow the grass down short in this area prior.
2. Layout plants before planting.
Now that you have prepared your soil it's time to lay out your plants! You can “pop”the plugs out of their cells so that you can lay everything out first before you start planting.
There are 3 different spacing recommendations for this starter pack. 6x6, 9x9, and 12x12 or 6 inch, 9 inch, and 12 inch. See the key above to know which plants need what spacing.
3. Plant!
Once your plants are laid out how you would like and with appropriate spacing, you are ready to plant! Using your spade or Hori Hori knife, push the blade directly down into the soil where your plant should go, then pull back making an opening in the soil, push your plant snugly into the hole, and remove the spade. Gently press soil around the plant to make good soil to root contact! Repeat this process until all the plants are planted!
Optional but recommended: mulch! The intensive spacing helps your flowers have a jump start ahead of the weeds, and shade out a lot of germinating weed seeds. However it is best practice to cover exposed soil to support the health of the microbes and biome of the soil. Grass clippings or chopped up leaves are a great option as they do not carry any seeds from weeds, but hay or straw can be applied with a heavier application (no soil exposed) to help suppress weeds and maintain soil health. We don’t recommend wood mulch, especially that has been artificially dyed.
4.Water!
WATER! This initial watering is very important! Using a hose or watering can, water closely at the base of each plant for a couple of seconds. Repeat this process twice! We always recommend a ‘water twice’ approach as the first pass doesn’t always soak down to the roots.
Maintaining Your Garden
Watering- As a general rule, your flowers will want about 1 inch of water per week. You will want to water your plants if there is a week without rain. Watering is best done in the morning. Water twice each time so the soil is fully saturated to the roots.
Weeding - If you mulch well and space intensively, weeding should be minimal. If you do decide to weed your garden, the smaller the weeds the easier they are to pull. Check back every two weeks to stay ahead of them.
Trellising - Once your plants get about a foot tall you will want to add support to your flowers so you have straight stems and your plants don’t topple when a strong storm comes in. We use Hortonova netting zip tied to 4’ tall wooden stakes. You will want to place the netting about 12 inches from the ground, and can slide the netting up as the plants grow or let them grow through the netting and add a second layer as needed later on.
Harvesting Your Flowers
Once your flowers start to bloom, it's time to cut! Bring with you a clean jar or bucket filled at least a third up with cold water and sharp cutting shears. Scissors are okay, but we highly recommend these.
The goal is to cut deep! This takes a little getting used to as it feels like you are going to hurt the plant, but the deeper you can cut on a single stem, the longer the stem will grow back. Always cut above a leaf node (where leaves are sprouting out from the stem).
Each variety will produce more than one flush of blooms, some more than others. Your cosmos, zinnias, and gomphrena will give you dozens of blooms throughout the season!
It is best to cut at least weekly! You’re welcome to enjoy your blooming flowers on the plants, but cutting will give you a longer bloom season. The purpose of flowers is to be pollinated and create seed. If you keep taking the flowers, they will continue to push out blooms in the effort to make seed. If you leave them on the plant, they will go to seed sooner. Feel free to experiment with saving seed at the end of the season!
Cut all the flowers you would like and bring them inside to rest and hydrate. It’s best to let them drink up water for at least 4-6 hours out of direct sunlight before arranging.
Arrange your flowers and admire your hard work!
Happy Gardening!
Share your success by tagging us @southernflorafarms ! We can’t wait to see your cut flower gardens!
Grow Like A Pro
Vegetable Garden Starter Pack
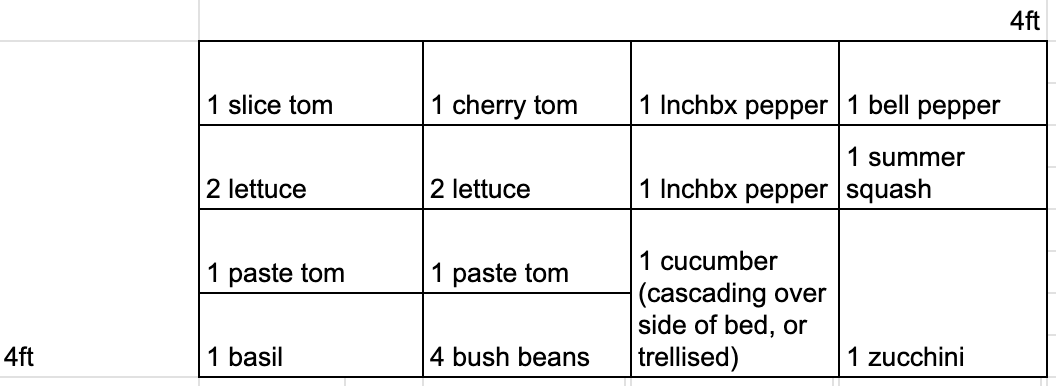
Variety & Spacing Guide:
2 Slicing tomato* 12×12 ‘Cherokee Purple’
2 Paste tomato* 12×12 ‘San Marzano’
1 Cherry tomato* 12×12 ‘Indigo Cherry Drop’
1 Cucumber* 24×24
2 Sweet Pepper ‘Lunchbox’ 12×12
1 Bell pepper 12×12
4 Romaine Lettuce 6×6
4 Bush bean 6×6
1 Basil 9×9
1 Summer Squash 12×12
1 Zucchini 24×24
* needs trellis or staking
Planting Instructions
Tools Needed:
Spade or garden trowel
Water hose with spray nozzle
Rake
Garden fork (optional)
Materials Needed:
Raised Bed Method: Raised Bed and Organic potting soil
Organic balanced fertilizer (optional- not necessarily needed if applying fresh potting soil)
Compost
Mulch (optional) - grass clippings or leaf mulch is best, straw/hay works with heavy application
Choosing a Site:
FULL SUN: at least 6-8 hours of direct sun per day If given the option, morning and midday sun is preferred over midday and afternoon, but either will work. Well-draining soil! Be sure to avoid areas where water pools up, your plants may rot if water does not drain. Any containers must have drainage holes.
1.Prepare your garden space:
For this starter pack you will want around 16 square feet, which could be a 4 foot x 4 foot space, an 8 foot x 2 foot bed, or some other variation. It can be a raised bed, but certainly does not need to be. If you run out of space, you can plant any of these plants in a pot! We have designed this garden bed to use intensive spacing (close spacing) but you are welcome to spread your vegetables out as you like. If you decide to spread them out over a larger area, you may want to consider mulching with grass clippings or shredded leaves to suppress weeds.
If you choose to do a raised bed you will want to use an organic potting soil at least on the top 4-6 inches. If planting directly into the ground you will want to till your soil to prepare it for planting. Add 1-2 inches of compost to the top of your soil and gently mix it in. Alternatively, you can utilize “no till”methods by suppressing and killing off grass for a few weeks with a tarp then lay cardboard, spray it down with water, then apply 4-6 inches of compost on top. Be sure to mow the grass down short in this area prior.
2.Layout plants before planting.
Now that you have prepared your soil it's time to lay out your plants! The seedlings can be separated easily so that you can lay everything out first before you start planting.
There are 4 different spacing recommendations for this starter pack: 6x6, 9x9, 12x12, and 24x24 inches. See the key above to know which vegetables need what spacing. Remember that proper spacing helps prevent disease and ensures your plants have enough resources to grow properly.
3.Plant!
Once your plants are laid out how you would like, you are ready to plant! Using your spade or garden trowel, push the blade directly down into the soil where your plant should go, then pull back making an opening in the soil, push your plant snugly into the hole, and remove the spade. Gently press soil around the plant to make good soil to root contact! Repeat this process until all the plants are planted!
Optional but recommended: mulch! The intensive spacing helps your vegetables have a jump start ahead of the weeds, and shade out a lot of weeds. However it is best practice to cover exposed soil to support the health of the microbes and biome of the soil. Grass clippings or chopped up leaves are a great option as they do not carry any seeds from weeds, but hay or straw can be applied with a heavier application (no soil exposed) to help suppress weeds and maintain soil health. Wood mulch is not recommended.
4.WATER! This initial watering is very important! Using a hose or watering can you will want to water closely at the base of each plant for a couple of seconds. Repeat this process twice! We always recommend a 'water twice' approach as the first pass doesn't always soak down to the roots.
Maintaining Your Garden
Watering
As a general rule, your vegetables will want about 1-2 inches of water per week depending on temperature. You will want to water your plants if there is a week without rain. Watering is best done in the morning to reduce disease risk. Water twice each time so the soil is fully saturated to the roots. Vegetables typically need more consistent watering than flowers, especially when fruiting.
Weeding
If you mulch well and space intensively, weeding should be minimal. If you do decide to weed your garden, the smaller the weeds the easier they are to pull. Check back every week to stay ahead of them. Keeping the garden weed-free is particularly important for vegetables to avoid competition for nutrients.
Trellising
For climbing vegetables like tomatoes and cucumbers, you will want to add support when they reach about a foot tall. Tomato cages, bamboo stakes, or a simple trellis system works well. For tomatoes, regular pruning of suckers and lower foliage will improve air circulation and fruit production. Your pepper plants will benefit from staking as well. We’ve had success with tomato cages for our peppers!
Harvesting Your Vegetables
Each vegetable has its optimal harvest time:
Leafy Greens (Lettuce): Harvest outer leaves as needed while the plant continues to grow, or cut the whole plant just above soil level.
Fruiting Vegetables (Tomatoes, Peppers, Cucumbers, Squash): Harvest tomatoes when fully colored but still firm; peppers can be harvested green or when they change color; cucumbers and squash when medium sized (harvest every 3 days once producing).
Beans: Harvest when pods are firm but before seeds bulge.
Herbs (Basil): Regular pinching encourages bushier growth. Harvest leaves from the top and sides.
The more you harvest, the more most vegetables will produce! Regular harvesting signals the plant to produce more. Always use clean, sharp scissors or pruners, especially for stem vegetables or just pluck bare handed!
After harvesting, rinse your vegetables gently with cool water to remove any soil or insects. Most vegetables can be stored in the refrigerator, though tomatoes and basil are best kept at room temperature.
Enjoy your homegrown produce immediately for the best flavor and nutritional value!
Happy Gardening!
Share your success by tagging us @southernflorafarms!
We can't wait to see your vegetable gardens!